See part 1 here. I think just about everyone should have received their save the dates by this point. Except for my uncle, so I guess that one got lost in the mail somewhere? Anywho. This is the view that most of our guests saw once they opened up their stds:
I say most because, unfortunately, Michael's didn't have enough paper doilies for me to make liners for all 100+ envelopes. Which brings me back to tip #1 - Figure out your entire project before mass producing! If I would have done this, I would have had plenty of time to gather all of my materials and order anything, if necessary.
After casually looking through the scrapbook paper at Michael's and Hobby Lobby early on and not seeing anything that would work as a liner, I resigned myself to not having them. Then inspiration struck in the decoupage aisle the weekend before my "due date" and I found these square paper doilies that fit perfectly in my envelopes! It was fate, I tell you. Not to mention, another thing added on to my list of last-second-things-to-accomplish-before-getting-these-in-the-mail. Luckily they were pretty easy and I got it done the Friday night before while hanging out with my good friends Stacy and Clinton.
These liners really ended up being that extra little something that our stds needed. And, of course, it made me hate sending out the "naked" envelopes - even though I know our guests wouldn't miss what they didn't know anything about. Then, when my dad told me that he almost opened theirs with a letter opener....aaak! I freaked out a tiny, little bit. I need to work on not being such a control freak/perfectionist.
Are you a follower of tip #1 when working on projects? Or do you just create and gather supplies as you go along?
Read all about our save the dates here:
Part 1 (envelopes)
Part 3 (handkerchiefs)
Part 4 (reception tags)
Monday, November 29, 2010
Wednesday, November 24, 2010
for your tears of joy: stds part 1
Our guests are starting to receive our save the dates!! I'm kind of impressed with the postal service - they were sent out Thursday afternoon and by Saturday they had already reached people in North Carolina, Florida and West Virginia. BUT. Not everyone has theirs yet, so I still can't do a full recap. However, I can start with the envelope since that won't reveal too much (and they aren't much of a surprise anyway due to this post). I'll work my way in from there, once they've all been received.
Our envelopes were Kraft paper, which I purchased from Paper Presentation. As much as I love Paper-Source, I'm not a fan of their Kraft paper and their prices were much higher. The Love sticker was a last second addition once I started sealing the envelopes and realized that some of them wouldn't stay closed. This was even after I started using my super-duper strength glue stick to seal them instead of just a damp sponge. I was worried that some would come open while making their way through the mail, and I already had sticker paper, so it was an easy fix.
This brings me to tip #1: Figure out your ENTIRE suite before you begin mass producing. It will save you time and possible frustration. If I had done this, I would have known far enough in advance that the envelopes didn't seal very well (not because of the actual envelopes, but because our stds were "puffy"). I would have been able to get my extra supplies far enough in advance, as well as the extra design work completed, instead of running around like a crazy person the weekend before I wanted to get them in the mail.
tip #2: Some mistakes are more expensive than others. For our Love labels, I downloaded a 2 inch round label template for the design and printed them on full sticker paper. When I went to cut them out with my 2 inch circle punch I noticed that I wasn't able to get a cut without part of the gray outline showing. So I hopped back on my computer, fixed the problem and printed out 5 copies for our 100 stds. Well, do you know what happens when you're cocky and confident that you fixed the problem and print 5 copies instead of only 1 to test your work? You waste 5 copies (and $$ - label paper is expensive!). So do as I say, not as I do and TEST YOUR WORK. Even if you are absolutely, positively sure that you did everything correctly - TEST YOUR WORK.
Did you learn any useful tips while working on your save the dates and/or invitations?
Read all about our save the dates here:
Part 2 (envelope liners)
Part 3 (handkerchiefs)
Part 4 (reception tags)
Tuesday, November 23, 2010
the final bm dress colors
I kind of left you all hanging with regard to the final bridesmaid dress decision. What colors did we choose? Well after much deliberation - yes, I fedex overnighted the swatches to my mom in Pennsylvania because I have a hard time making up my own mind without her input - we decided on these beautiful shades of blue:
Powder Blue, Tiffany Blue, Mist, Paradise and Pond
(this photo shows the colors more true to life than the ones shown below, fyi)
MOH Ashley - LulaKate Pearl (as shown) in Powder Blue
MOH Sam - LulaKate Angela (as shown) in Tiffany Blue
BM Emily - LulaKate Pam (with straight skirt) in Mist
BM Katie - LulaKate Gina (with straight skirt) in Paradise, which is the color of the dress she has on
BM Becca - LulaKate Pearl (with box pleat skirt) in Pond
I'm really excited about the choices we made and think the different shades flow nicely together. I can't wait to see what they all look like on the day of the wedding!
Do you ever have a hard time making decisions on your own? Is there one person's input that you rely on more than anyone else's?
Monday, November 22, 2010
mail merge tutorial
Setting Up Your Spreadsheet
This will be the most involved process, for sure. If you're organized/Type A/OCD/anal/(whatever word you deem appropriate here), like me, then chances are you already have a spreadsheet set up for your guest list. Perfect! It will probably only take a few tweaks to be mail merge ready. I'll start from scratch, though, to make things simple.
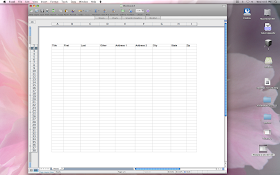
1. Create a new spreadsheet in your program of choice - we already know that my heart belongs to google docs, but since the majority of people are more comfortable with excel, I'm going to use that. I like to adjust my page setup to landscape and zoom in so I don't have to squint.
2. Set up your columns - the way you set this up depends on how you want your envelopes to look. For me, I wanted them to be in the following format:
Mr. and Mrs. Joe Blow
1234 Main Street
New York, New York
10010
Therefore, my columns were like so:
Title - for Mr. and Mrs. or Miss or Ms. or Dr., etcetera
First
Last
Other - I set this up for those envelopes that had a recipient name on a second line. For instance, two friends who are engaged and living together but not yet married or for children. Write this in exactly as you want it on the envelope.
Address 1 - for the street address
Address 2 - for apartment numbers
City
State - determine whether you want the full name or just an abbreviation
Zip
3. Fill in your data!
Prepping Your Word Document
The next step in this process is creating a mail merge template in Word. Unfortunately, Google Docs doesn't have a mail merge option (boo), so if you created your spreadsheet there you can just download it onto your computer, which we will need later.
1. Open up a new document in Word
2. Adjust your settings - since the default is set to 8.5 x 11, we need to make some adjustments to accommodate an envelope. I'm going to use the measurements for an A7 (5.25 x 7.25) envelope since those seem to be fairly common in the wedding world.
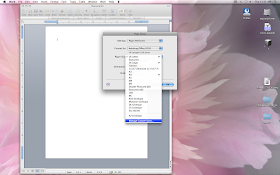
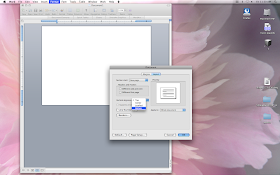
a. Go to "File" and click on "Page Setup"
b. Click the drop down arrow next to "Paper Size" and select "Manage Custom Sizes"
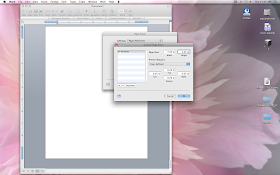
c. Change the name of your custom size by clicking once on the name listed. It should say untitled. If not, click the plus sign to add a custom size.
d. Change the Page Size to 7.25 width and 5.25 height (or whatever size your envelope is)
e. Change the Printer Margins if you need to. I set mine to 0.25 on each side (but you can leave them on the default settings if you want).
f. Click "OK" and then "OK" again.
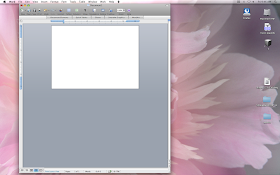
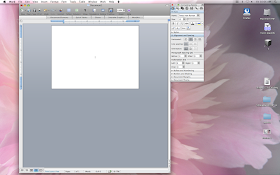
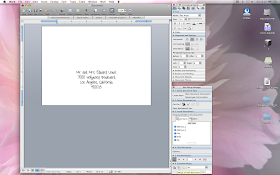
You should now have a document that looks like this:
3. Adjust your vertical alignment
a. Go to "Format" and click on "Document"
b. Click on "Layout" (at the top)
c. Click the drop down arrow next to "Vertical Alignment" and select "Bottom"
d. Click "OK"
4. Adjust your horizontal alignment
a. Make sure your Toolbox is open
b. Under "Alignment and Spacing" choose "Align Center"
Creating a Mail Merge Template
This next part might get a little tricky.
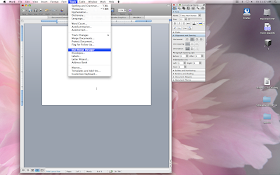
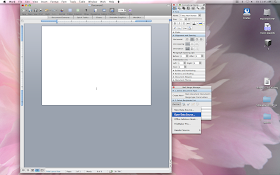
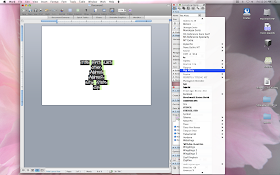
1. Go to "Tools" and click on "Mail Merge Manager"
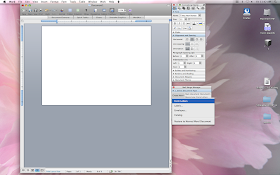
2. A new "toolbox" should pop up somewhere. Under "Select Document Type" click on "Create New" and then "Form Letters" (You might notice that there is an "Envelopes" option - don't click on this or your formatting will get screwed up)
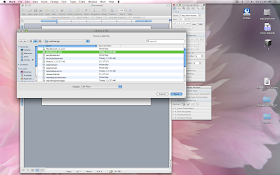
3. Under "Select Recipients List" click "Get List" then "Open Data Source"
4. Navigate to your saved Excel spreadsheet and click "Open" (a warning might pop up, just click "OK")
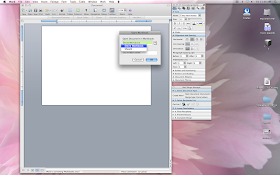
5. If another dialogue box pops up, like the one below, select "Entire Workbook" from the drop down menu and click "OK"
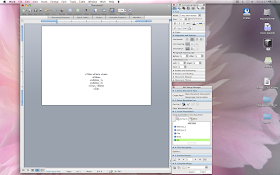
6. You should now see the column titles you created earlier under "Insert Placeholders." Drag these into your document one by one to set up your template, placing spaces and commas where needed
7. Now that you have the basic template, you can customize the font, size, color, etcetera
8. Almost there! Before you actually perform the mail merge, you can first preview to make sure everything is set up correctly. Click the "View Merged Data" button under "Preview Results" and use the red arrows to scroll through your data.
9. Now for some magic. If everything looks good, click on "Merge to New Document" under "Complete Merge"
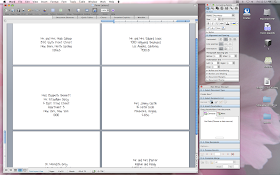
10. And Voila! All of your envelopes are in one document, ready to print.
Now, if you only have five or ten addresses, it would probably be quicker just to copy and paste or re-type these into Word. For our save the dates, though, I had over 100 envelopes to print so this was definitely a time saver (especially since I already had a spreadsheet)! Also, if you want to do labels instead of printing directly onto the envelopes, you can do that through mail merge too! Just let me know if you want a separate tutorial on that.
Friday, November 19, 2010
why mail merge is my best friend
...when it comes to printing a boat-load of envelopes, that is.
I know I've already waxed poetic about Google Docs, but now it's time for me to share the love - with Word and the wonder (and time saver) that is Mail Merge. For those of you wanting hand-written or calligraphed envelopes, mail merge doesn't really apply. The future mister and I, however, decided to print on our save the date envelopes with the same font we used on the stds for a cohesive look and to save time and money. What's that you say? Re-typing a hundred or so names and addresses into word to print on envelopes doesn't save time? Mail merge to the rescue! If you already have a guest list set up in spreadsheet form, it won't take very long at all. A few clicks here, a few adjustments there and you have a Word doc with all of your envelopes ready to print.
I've actually created a tutorial, which I'll post on Monday for those of you interested.
What shortcuts did you use (if any) to save your time and/or sanity during the planning process?
Thursday, November 18, 2010
and they're off!
Our save the dates, which have been many months in the making, are finally off to their new homes. When I first started this project I thought that I would be incredibly sad and reluctant to send them off. But, honestly, they have been such a pain in my butt as of late that I was actually sort of happy. That probably also has to do with the fact that they turned out better than I could have imagined (despite the frustration) and I'm excited that our friends and family will be able to see the fruits of my labor in only a few days time. I hope they all love them as much as I do!
Wednesday, November 17, 2010
decorating our ceremony space
The future mister and I will be getting married in a brick-walled "sunken garden" surrounded by beautiful foliage. It is a space that is utterly gorgeous on it's own, which is why I hadn't given much thought to decorations or floral arrangements. I figured that we'd hang some mason jars or small vases with wild flowers from a few of the chairs lining the aisle and call it a day.
Then mom suggested something that I think will be the perfect way to add some flowers while at the same time keeping in line with my simple/rustic aesthetic and complementing, instead of taking away from, the natural beauty of the space.
A simple bouquet, like the one above, hanging upside down from the pillars of the brick wall would add some color and just the right amount of pizazz. Here's my (sad) attempt at Photoshopping what it might look like:
Hey, it's good enough to get my point across. For now, I think I'll just let this marinate a bit until the next time I meet with Epting. They might have some ideas that we haven't even thought of yet.
What was your design aesthetic for your wedding? How did you decorate your ceremony space?
(source)
My mom, though, wasn't really convinced that this would be enough (and she is much better at seeing the bigger picture). She asked me if I wanted to have an arch. No, thanks. Well, what about urns of flowers perched on top of the wall or on pedestals like so:(source)
Don't get me wrong, these arrangements are very lovely but just way too big for my tastes.
(source)
And sorry Cupid, you're not invited either.(source)
A simple bouquet, like the one above, hanging upside down from the pillars of the brick wall would add some color and just the right amount of pizazz. Here's my (sad) attempt at Photoshopping what it might look like:
Hey, it's good enough to get my point across. For now, I think I'll just let this marinate a bit until the next time I meet with Epting. They might have some ideas that we haven't even thought of yet.
What was your design aesthetic for your wedding? How did you decorate your ceremony space?
Monday, November 15, 2010
breaking tradition
Last night I decided to make black bean soup for dinner. It calls for pureeing black beans and chicken broth in a blender. Our old blender is sadly missing it's lid, so the last time I made this recipe I just used our immersion blender (i.e. the future mister's protein shake maker). Well this time, the immersion blender was dirty and I didn't feel like cleaning it. And, well, why would I take the fifteen seconds required to clean it when I could use our fancy NEW blender?! This thing is amazing and I'm already trying to come up with more reasons to use it (THANK YOU KATIE!).
Now, I have heard the old wives' tale/tradition of waiting until after the wedding to use your shower gifts - just in case the wedding ends up being called off. Call me a bad bride, but I clearly broke tradition with this one. First of all, what if the gift doesn't work? Or is broken? Usually you can only return/exchange things within so many days of purchase. Also, with kitchen appliances it is always a good idea to register the product for warranty purposes.
That being said, did you come up with reasons to use your shower gifts before the wedding? Or did you follow tradition and wait until after?
Friday, November 12, 2010
bridesmaid shoe-spiration
As of Wednesday afternoon all of the bridesmaid dresses have been ordered! They will all be wearing LulaKate dresses in different shades of blue. I'll let you know what we ended up choosing for the final colors a little bit later. For now, though, let's talk shoes. I'm going to let my lovely ladies pick their own shoes (or wear ones they already have), but I'm having a hard time deciding which direction I want to take. The choices are endless, I guess, but I've narrowed it down into a few different color categories - silver, gold, pewter, nude/beige/ivory, or something fun like raspberry or fuchsia.
1. Nina Culver 2. Naturalizer Prissy 3. Anne Klein Frolic 4. Anne Klein Kalei
5. Nina Forbes 6. Naturalizer Princeton 7. Me Too Sweet
1. Nina Electra 2. Romantic Soles Hailey 3. Isola Dolce
4. Etienne Aigner Vivica 5. Lovely People Karen
What color do you think would go best with light blue/aqua/robin's egg blue dresses? Did you have your bridesmaids wear the same shoes or did they pick their own?
1. BCBG Mirna 2. Butter Claudia 3. Nina Papina 4. RSVP Sadie 5. Brigitte Bailey
6. Nine West Accolia 7. Badgley Mischka Randall 8. BCBGirls Ariel
1. Nina Culver 2. Naturalizer Prissy 3. Anne Klein Frolic 4. Anne Klein Kalei
5. Nina Forbes 6. Naturalizer Princeton 7. Me Too Sweet
1. Nina Electra 2. Romantic Soles Hailey 3. Isola Dolce
4. Etienne Aigner Vivica 5. Lovely People Karen
1. Nina Fulvia
What color do you think would go best with light blue/aqua/robin's egg blue dresses? Did you have your bridesmaids wear the same shoes or did they pick their own?
Wednesday, November 10, 2010
my not so secret love affair
It started a few years ago. At work. It was love at first sight. Google Docs, oh how I love you.
I know I'm probably not the first to gush about the amazingness of Google Docs. Those of you who use it know what I'm talking about. And those of you who still email documents to yourself or carry around flash drives or external hard drives need to get with the program. I cross my heart, it's the best thing since sliced bread - especially when it comes to wedding planning!
Pros:
Keeps me organized
Works just like Microsoft Office
I can upload documents and files not created in Google Docs (i.e. all my vendor contracts)
All of my documents are easily accessible as long as I have the Internet
I can share my documents or folders with other people
Cons:
Unfortunately, other than my dad and the future mister, most of our family members are not computer savvy enough (or willing to learn) to use the collaboration feature
My favorite use so far has been with the guest list. The last few weeks we have been in the process of gathering addresses. So as soon as we get one, I can pop it into my spreadsheet whether I'm at work, on my desktop computer in my home office, or on the future mister's laptop while sitting in the living room. Easy, peasy, lemon squeezy.
Another great thing about Google Docs? TEMPLATES! Budget spreadsheets, to-do lists, calendars, resumes, photo albums...
and wedding planning! Last spring, I believe, Google Docs teamed up with Style Me Pretty to roll out various types of wedding templates - budget, guest list, schedule, to-do list, seating chart, music list, etc. Or you can have them all in one document and download the All-in-One Wedding Planner, which is what I did.
The budget spreadsheets are pretty awesome because they automatically calculate everything for you. I mostly use it to keep track of vendors, though. For instance, when I was researching DOCs, the spreadsheet allowed me to keep track of each company, their contact information, price, notes, and I also added a column to indicate when I contacted each person. I plan on doing the same for a make-up artist/hair stylist and any other vendors I don't have booked yet.
My only gripe, which isn't really a gripe at all, is with the guest list spreadsheet. I chose to create my own spreadsheet so I could set it up properly for mail merge (more on that later). The bottom line is that I Love Google Docs. And I promise that they didn't pay me to say that.
Do you share my love affair with Google Docs? How did you stay organized during your planning?